iPhone Food Photography for Restaurant Owners and Marketing Managers: A Dubai Professional's Guide
- Ibrahim Doodhwala
- Jul 18, 2025
- 15 min read

Updated: Apr 10

The Question I Get Asked at Every Restaurant Shoot
I get asked this constantly: can you really take professional-looking photos with just an iPhone? The answer, without qualification, is yes for certain applications and certain purposes. The more useful answer is: it depends entirely on what you understand about light, composition, and the specific visual requirements of food photography, because the phone is a tool and the tool is only as good as the understanding behind it.
This guide is written specifically for restaurant owners and marketing managers in Dubai who need to produce regular social media content without booking a professional photographer for every post. It covers what the iPhone is genuinely capable of, how to get the most from it for food photography in a restaurant environment, and where its limits are relative to professional production. All of it comes from working with Dubai restaurants professionally for over a decade and watching what actually makes the difference between phone photography that performs and phone photography that disappears.
Before the Camera: Think Like a Customer, Not a Cook
The most important shift in how a restaurant owner or marketing manager approaches food photography has nothing to do with the phone. It is a shift in perspective: from the kitchen's perspective on the dish to the customer's perspective on the experience.
When a chef plates a dish, they are thinking about balance, portion, and presentation from a distance of roughly half a metre. When a food photographer shoots that same dish, the question is what the image communicates to someone who has never been to the restaurant, who is encountering the brand for the first time through a four-inch screen on a delivery platform or a six-inch screen on Instagram. Those are completely different communication challenges.
Before you pick up the phone, ask yourself: what is this dish for? A sharing platter is for social occasions, casual conversation, the experience of eating together. The photograph should communicate that social warmth. A healthy breakfast bowl is for people making conscious choices about how they start their day. The photograph should communicate freshness, energy, and the satisfaction of a good decision. A fine dining dessert is for a specific kind of occasion and a specific kind of pleasure. The photograph should communicate elegance and intention.
When you know what the dish is for, every subsequent decision, the angle, the props, the light, the composition, becomes clearer. You are not just photographing food. You are photographing an experience that the food belongs to.
Light: The Single Variable That Determines Whether Phone Photography Works
Light is the most important variable in all food photography and it is where the difference between effective iPhone food photography and ineffective iPhone food photography is most directly visible. A phone's camera sensor is capable of producing excellent images in good light. In poor light, the computational photography that modern iPhones use to compensate introduces noise, colour distortion, and a flat, lifeless quality that no amount of editing can fully recover.
The practical implication is simple but requires actual discipline to apply: never photograph food under restaurant ambient lighting. Restaurant lighting is designed to create atmosphere, not to make food look appetising on camera. It almost always comes from overhead sources that flatten texture and eliminate the depth and dimension that make food look genuinely good in a photograph. It introduces colour casts that distort the natural colour of the food. And it is typically too dim for a phone camera to handle without introducing noise.
Window Light: What to Find and How to Use It
The best light available to a restaurant owner photographing food with an iPhone is a large window in indirect light. In Dubai, north-facing windows provide consistent, soft, even light throughout the day without any direct sun. East-facing windows provide warm, directional light in the morning hours that is particularly beautiful for breakfast and café content. West-facing windows provide similar quality in the late afternoon.
Position the dish within one to two metres of the window, with the window to the side of the dish rather than directly in front of or behind it. This side-lighting position is the most effective because it creates directional light that reveals the texture of the food surface, the same principle that professional photographers use with their studio lighting. Take a white napkin or a piece of white card and place it on the opposite side of the dish from the window to act as a reflector, bouncing some of the light back into the shadow side. This simple two-element setup, window light on one side and white reflector on the other, is the foundation of excellent food photography and it costs nothing.
In Dubai during the summer months, the midday sun is intense and the window of soft, usable natural light is compressed into the early morning and late afternoon. Plan your content shoots for these windows, particularly if you have east-facing windows that provide the warm morning light that works so well for café and breakfast content.
When Natural Light Is Not Available
For evening shoots and situations where natural light is not available, a simple LED panel with a diffusion attachment produces much better results than trying to work with restaurant ambient lighting. An affordable LED panel positioned at a 45-degree angle to the dish, with a reflector on the opposite side, replicates the side-lighting setup described above in artificial light. It is a small investment that transforms the quality of phone photography in low-light conditions.
One absolute rule for phone food photography: never use the iPhone's built-in flash. It fires directly from the camera position, which is the worst possible lighting direction for food. It creates flat, harsh images with no textural depth and with unpleasant reflections off any glossy surface. The flash should be disabled and never used for food photography under any circumstances.
iPhone Camera Settings That Actually Make a Difference
Modern iPhones are sophisticated enough that the default camera settings produce good results in good light without significant adjustment. There are a small number of settings and techniques that are worth knowing because they make a consistent, meaningful difference to food photography specifically.
Tap to Focus and Exposure
The iPhone camera focuses automatically, but for food photography you want to control exactly where the camera focuses. Tap on the most important part of the dish, the element that communicates the food's quality most directly, the sear on the protein, the surface of the dessert, the texture of the bread. This ensures the hero element is sharp rather than relying on the camera's guess about where the subject is.
After tapping to set focus, a sun icon appears beside the focus square. Slide this icon upward to increase brightness and downward to decrease it. For most food photography, erring slightly on the brighter side than the camera's automatic exposure produces a more appealing result, because slightly bright images communicate freshness and appetite appeal more effectively than slightly dark ones. The exception is deliberately moody, darker-toned content for premium positioning, where a slightly underexposed image can feel more sophisticated.
Grid Lines and Composition
Enable the camera grid in Settings under Camera. The grid overlays the viewfinder with a three-by-three grid that makes the rule of thirds immediately visible and easy to apply. Place the main element of the dish at one of the four intersection points of the grid rather than dead centre, and the composition immediately feels more considered and dynamic. This is a small change that makes a genuinely visible difference to how the images look.
Portrait Mode for Hero Shots
Portrait mode on the iPhone creates a simulated depth-of-field effect that blurs the background while keeping the subject in focus. For individual dish hero shots where you want the background context of the restaurant to be present but subordinate to the food, Portrait mode produces a more visually sophisticated result than standard mode. The limitation is that it does not work well at very close distances or for flat lay overhead compositions. For those, standard mode produces better results.
The ProRAW and Photographic Styles Options
On iPhone Pro models, ProRAW capture preserves more image data than the standard HEIC format, which gives you more flexibility in post-production editing particularly for challenging light conditions. If you are regularly editing your phone photos before posting, shooting in ProRAW is worth the additional file size. For photos that are going directly from phone to social media with minimal editing, the standard format is adequate.
Photographic Styles, available on iPhone 13 and later, allow you to set a consistent visual treatment across all your photos without editing each one individually. A warm, slightly vibrant style applied consistently across all your restaurant's content creates visual coherence that helps build brand identity across your social media feed.
Composition: The Angles That Work for Restaurant Food Photography
The 45-Degree Angle
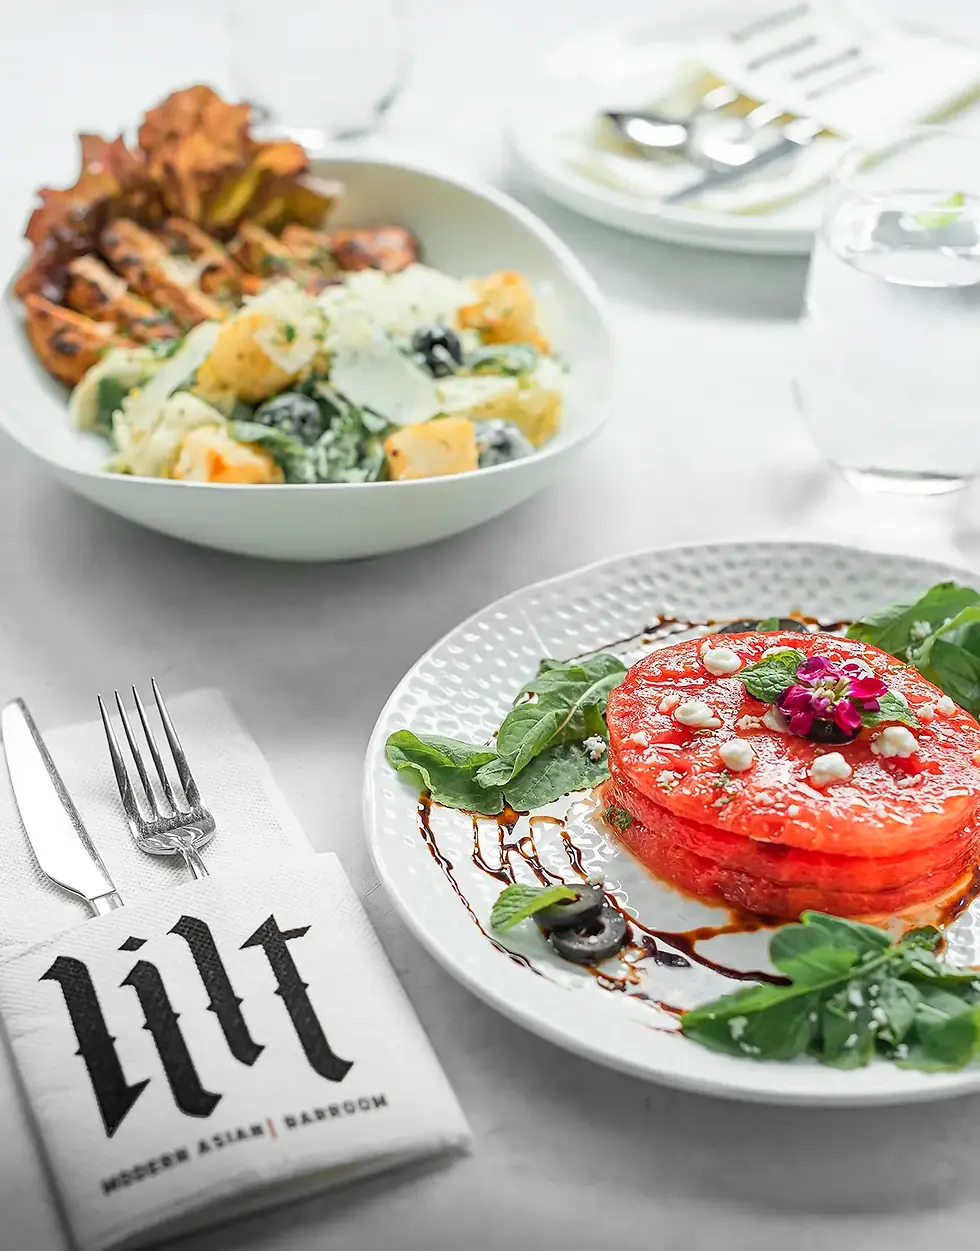
The 45-degree angle, with the phone positioned roughly at the height of the table and tilted at approximately 45 degrees above the dish, is the most reliable and consistently effective angle for food photography because it mirrors the natural viewing angle of a person sitting at a table looking at their food. It shows the height and architecture of the dish, which communicates abundance and quality. It allows the garnish and top surface of the dish to be visible while also showing the sides and the plating context. It is the go-to angle for almost any plated dish.
The Overhead Flat Lay
Shooting directly overhead, with the phone held parallel to the table surface and aimed straight down, works particularly well for dishes with strong visual patterns from above: a pizza, a sharing platter with multiple components, a breakfast spread, a table of dishes photographed together. It eliminates depth and makes the composition entirely about the pattern and arrangement of elements, which can be very graphic and visually powerful when the arrangement is well thought out.
The practical challenge of overhead photography with a phone is keeping the camera perfectly parallel to the surface and eliminating camera shake. A small tabletop tripod with an overhead arm solves both problems. Without one, brace your elbows firmly against the table edge and use the volume button rather than the on-screen button to fire the shutter.
The Close-Up Detail Shot
Close-up detail shots, moving in very close to show a specific textural or visual quality of the food, are among the most engaging content types for food social media. The condensation on a cold drink. The glaze on a piece of pastry. The char marks on a grilled item. The cross-section of a burger showing its layers. These detail shots communicate quality in a way that wider shots cannot because they bring the viewer close enough to the food that they can almost feel its texture.
The iPhone's camera does not have true macro capability in the way that a dedicated macro lens does, but tapping to focus very close to the subject and using Portrait mode to create background separation produces close-up results that work well for social media content at the sizes where it is viewed.
Food Styling for Phone Photography: What Restaurant Teams Can Do
Food styling does not require a professional stylist to produce meaningful improvements to phone food photography. Understanding a small number of principles and applying them consistently makes a significant difference to the quality of the images your team produces.
The Three Elements of Context
Every food photograph benefits from three types of elements: the hero dish, props that communicate the context of the experience, and a surface or background that supports rather than competes with the food. Getting these three elements right produces images that tell a complete story rather than simply documenting a dish.
For a breakfast dish: the hero, a coffee cup, a folded napkin, and a wooden surface creates a complete morning context. For a sharing platter: the hero, additional smaller dishes around it, and some hands or cutlery in motion communicates the social occasion. For a fine dining dessert: the hero, a clean white surface, and a single elegant prop, a teaspoon, a small sauce pool, creates the premium register. The principle is that every element in the frame earns its place by contributing to the story.
Intentional Imperfection
One of the most effective and most counterintuitive principles in food photography for social media is what I call intentional imperfection: elements that suggest the food has been, or is about to be, eaten. A sauce drip down the side of a bowl. A bite taken from a piece of bread. A slightly uneven scattering of herbs. A spoon resting in a dish as though just used.
These elements work because they communicate that the food is real and appetising enough to be eaten rather than merely arranged for display. They create the impression of an authentic moment rather than a formal product shot, which is the visual register that performs best on social media for most food categories. Completely perfect, untouched food photography can feel cold and uninviting in a way that food with slight signs of human interaction does not.
Colour and Contrast
The colour relationship between the food, the surface, and the props is one of the most direct levers available to anyone composing a food photograph. A dark surface beneath warm-toned food creates contrast that makes the colour of the food pop. A light, neutral surface beneath a colourful dish lets the colours of the food read clearly without competition. Complementary colours, a green garnish on a red tomato sauce, an orange element against a blue-grey background, create visual energy that makes an image more dynamic.
The most common colour mistake in restaurant phone photography is using the restaurant's existing tableware and surfaces without considering how they work with the specific dish being photographed. A dish that looks beautiful on a dark plate on a dark table may look visually flat in a photograph because there is not enough contrast between the food and its immediate environment. A white plate on a white napkin on a white table produces a similar problem from the other direction. Building contrast into the composition, even slightly, consistently produces more visually interesting results.

iPhone Food Photography in Dubai's Restaurant Environment
The Dubai Light Challenge
Dubai's light presents specific opportunities and challenges for restaurant iPhone photography. The city's abundant sunshine is an asset for any restaurant with windows, particularly in the cooler months when the morning and late afternoon light is genuinely exceptional. East-facing windows in the morning from October through March provide the kind of warm, directional window light that food photographers travel for.
The challenge is the summer months and the intensity of direct sunlight even in winter. Direct Dubai sunlight through a window is too harsh for most food photography without diffusion. A sheer curtain or a piece of white diffusion fabric across the window transforms it into soft, usable light. Most restaurant teams can manage this with existing soft furnishings rather than purchasing specialist equipment.
Dubai's Visual Food Culture
Dubai's food market is one of the most visually sophisticated in the world. The consumer base has high aesthetic expectations shaped by exposure to premium food content from global markets. At the same time, Dubai's multicultural character means that authentic cultural food photography, Arabic food presented in its genuine cultural context, South Asian food photographed with appropriate warmth and specificity, East Asian food photographed with the precision the cuisine deserves, performs strongly for the audience segments these cuisines serve.
The practical implication is that generic, non-specific food photography, images that could have been shot anywhere for any brand, tends to underperform in Dubai's market. Content that has a specific visual identity, that communicates something genuine about the restaurant's cultural heritage or design aesthetic or food philosophy, performs better because it is distinctive in a market where a lot of visual content is interchangeable.
Building a Practical Content Workflow with Your iPhone
Planning the Shoot
The most significant improvement most restaurants can make to their iPhone food photography is to stop treating it as something that happens spontaneously and start treating it as something that is planned. Even a basic planning approach, identifying which dishes you are photographing this week, identifying the best window in your restaurant for the current season and time of day, and preparing the props and surfaces before the food arrives on set, produces dramatically better results than photographing whatever comes out of the kitchen at whatever moment is convenient.
A simple content calendar that maps your shooting schedule to the times of day when your restaurant's natural light is best, and that identifies the shot types and dishes for each session, is the organisational tool that makes consistent, quality content possible without requiring a professional photographer at every turn.
The Shot List
For each dish you photograph, aim for a minimum of three different types of images: a hero shot at the 45-degree angle, a detail or close-up shot that shows one specific textural or visual quality of the food, and a context shot that shows the dish in a lifestyle or environmental setting. These three shot types together give you enough variety to use the content across different social media formats without running out of material from a single session.
Editing for Consistency
Basic editing before posting makes a visible difference to the quality of iPhone food photography. The three adjustments that matter most are white balance correction to ensure the colour of the food is accurate, exposure adjustment to ensure the image is not too dark or too bright, and slight sharpness enhancement to compensate for the slight softness that phone cameras introduce in close-up work.
Using a consistent editing preset, either through a third-party app like Lightroom Mobile or through Apple's own Photos editing tools, ensures that all your content has a consistent colour and tonal treatment. Consistency across your content is what builds the visual identity of the brand on social media over time. Individual brilliant images matter less than a consistently strong, recognisably coherent feed.
Being Honest About Where iPhone Photography Reaches Its Limit
iPhone food photography is genuinely capable of producing content that performs well for daily social media, story and behind-the-scenes content, menu update imagery, and the regular stream of content that keeps a restaurant's social media presence active and engaging. For these purposes, a well-executed iPhone approach is often the most practical and cost-effective solution.
The applications where iPhone photography reaches its limits and where professional production makes a commercially significant difference are specific and consistent. Grand opening photography, where the visual impression of the restaurant needs to be as strong as possible for the launch moment. Annual hero photography for the website and menus, where the images will represent the brand for an extended period and across multiple high-visibility touchpoints. Paid advertising, where the quality of the opening frame directly affects click-through rates and ad performance. And any application where the photography needs to carry the full weight of communicating premium brand positioning.
For these applications, the gap between iPhone photography executed very well and professional photography is visible and commercially significant. The quality of the light, the precision of the food styling, the technical capability to handle the specific challenges of each dish type, all of these produce outcomes that the best iPhone photography genuinely cannot replicate.

A Practical Weekly Content Framework for Dubai Restaurants
Building a sustainable content practice with your iPhone is more about consistency and system than about any individual technique or piece of knowledge. Here is a framework that works for most Dubai restaurant social media accounts.
Monday and Tuesday: Hero Dish Photography
Dedicate one morning during the early part of the week to photographing the dishes you want to feature that week. Use the best available window light, set up the reflector, and work through your shot list methodically. Aim for three to five dishes with three shot types each, which gives you nine to fifteen usable images from a single two-hour session.
Wednesday and Thursday: Behind-the-Scenes Content
Mid-week content that shows the kitchen, the preparation process, and the people behind the restaurant builds the human connection between the brand and the audience that hero dish photography alone cannot create. Phone photography is often better suited to this content type than professional photography because the spontaneous, documentary character of phone imagery is appropriate for behind-the-scenes content in a way it is not for hero product shots.
Weekend: Lifestyle and Atmosphere Content
Friday and Saturday are the peak social days in Dubai's food and restaurant market. Weekend content that captures the atmosphere of the restaurant, the social experience of dining there, and the seasonal or occasion-specific aspects of the weekend menu, builds the aspirational dimension of the brand that drives new customer acquisition. Groups of people enjoying food, the restaurant at its most vibrant, the specific things that make your weekend dining experience distinctive from the weekday one.
One underused content opportunity: the moment food arrives at the table. The first few seconds after a dish is placed in front of the diner, when the food is at its freshest and the diner's reaction is genuine, produce some of the most authentic and engaging content available. Keep a phone ready and capture this moment for select dishes. The authenticity of genuine customer reaction is something that no amount of professional styling can replicate.
The Bottom Line
The iPhone is a genuinely powerful tool for food photography when the person using it understands light, composition, and the visual language of the food they are photographing. It is not a substitute for professional photography in applications where professional quality matters commercially. But for the regular content that keeps a restaurant's social media presence active, engaging, and visually consistent, a well-executed iPhone approach is the practical solution that most Dubai restaurant marketing teams should be using.
The investment is not in better equipment. It is in better understanding. Learn where the good light is in your restaurant and at what time of day. Learn which angles communicate which types of food most effectively. Learn what props and surfaces support your brand's visual identity. Apply that understanding consistently. The results will speak for themselves.
Want to see what your food looks like with professional production?
At Spinthiras Media, we work with Dubai restaurants on both their regular content strategy and their hero photography. If you want to talk about the right balance of professional and iPhone content for your brand, let's start that conversation.
A couple of years ago I helped manage social media for a small café in Dubai and quickly realized how much the food photos mattered. Customers scrolled fast, so we started using just an iPhone to capture dishes right at the tables during service. Natural light from the big windows in the morning gave everything a fresh, warm look without harsh shadows.
We learned to tap and adjust exposure to make the colors pop, keep the phone steady for clean 45-degree shots, and add simple props like a napkin or fresh herbs to tell the real story of the meal. Overhead flat lays worked great for sharing platters, while close-ups highlighted textures like crispy edges or creamy sauces. The multicultural…