

5 FOOD STYLING SECRETS TO MAKE YOUR MENU LOOK FRESH IN DUBAI'S HEAT

I want to start this post with a story that still makes me a little anxious when I think about it.
A few years back I was hired to shoot a perfume brand on the beach. Four bottles, four different fragrances, a full setup built on location under the Dubai sun. The client had produced these four bottles specifically for the shoot. Four perfectly filled, perfectly sealed, ready-to-photograph perfume bottles.
I had no idea that brand new perfume bottles, ones that haven't been tested or pressure-checked yet, have a chemical reaction with extreme heat. Perfume bottles are designed with empty space inside precisely because the liquid expands. When that expansion meets Dubai summer temperatures and direct sunlight, the pressure builds. And if the bottle hasn't been through proper quality control, that pressure finds a way out.
I set up the first bottle. Framed the shot. Looked through the viewfinder. And watched the bottle burst.
I thought I had dropped something, bumped something, done something wrong. I repositioned. Set up the second bottle. Same thing, it burst. Then the third. It was only when the third bottle went that I realised: it wasn't me. It was the heat. Dubai heat, doing something to these bottles that no shoot brief had warned me about and that I had never encountered before.
The client was understanding, thankfully. We came back and did the shoot properly under controlled conditions. But that day taught me something I carry into every single shoot now: in Dubai, the environment is a participant in your shoot whether you plan for it or not. You either prepare for what this climate does to your subjects, or the climate decides the outcome for you.
Food is far more vulnerable than glass perfume bottles. And the window you have to capture it at its best is much shorter here than anywhere else. What follows are five real techniques, the ones I use and the ones the professional food stylists I work with have taught me, for keeping food looking fresh, vibrant, and alive under conditions that are working against you constantly.
First, Let's Be Honest About What Food Styling Actually Is

There's a myth that food in professional photographs is fake. Mashed potatoes standing in for ice cream. Glue poured instead of milk. Motor oil brushed onto pancakes to fake syrup. Cardboard hidden inside burgers to prop them up.
Some of these tricks are real and have been used historically in advertising. But the industry has shifted significantly, and 2026 is the clearest moment yet in that shift.
90% of professional food photography now uses real food. Not because photographers and stylists have suddenly become more ethical, but because audiences can tell. Consumers in 2026, especially in the UAE where food content is everywhere and people are visually educated, spot artificiality immediately. And when they do, they don't just scroll past that image. They lose trust in the brand behind it.
The goal of modern food styling is not to substitute or fake. It's to capture real food at its absolute peak moment, using techniques that slow down deterioration, enhance what's naturally there, and control the environment precisely enough to get the shot before reality takes over.
In Dubai's heat, that window is brutally short. Which is why every single technique in this post is about buying time, not manufacturing fiction.
I also want to say this clearly: I work with professional food stylists on my shoots. I am a photographer, not a food stylist. The best food styling I've witnessed has come from collaborations with specialists like Famine, a stylist I worked with on a stadium cafe shoot where the outdoor heat was relentless. She was the one calling the shots on what would hold and what wouldn't, what needed to be plated last, what needed to go back in the chiller between frames. A good food stylist reads the environment and the food simultaneously in real time. That skill is its own discipline, and I have deep respect for it.
What I'm sharing here is a combination of what I've learned from those collaborations and what I've developed through 12+ years of shooting food in this specific climate.
Secret 1: Control the Sequence, Not Just the Setup
The single most important thing you can do on a food shoot in Dubai has nothing to do with equipment. It's about the order in which you shoot.
Every dish on your shoot list has a different heat tolerance. Ice cream melts in minutes under studio lights. Fresh herbs wilt fast. Anything with a dairy component, sauces, cream, cheese, starts to separate and sweat. Fried food loses its crunch. Bread goes soft. Glazed items crack as they cool unevenly.
A professional shoot sequence plans for all of this before a single dish comes out of the kitchen. The most heat-sensitive, most perishable items are shot first, while the studio is still at its coolest and the lighting setup hasn't had time to warm the air. Items that can hold their appearance longer come later.
On a full menu shoot in summer, we often start as early as possible in the morning for this reason. Not just for the light. For the temperature. Every degree matters when your subject is food.
The practical version of this for a restaurant owner doing their own shoot: make a list of everything you're photographing and sort it by how fast it deteriorates. Shoot the most fragile things first, when everything including you is freshest. Don't plate the next dish until you're ready to shoot it immediately. Food sitting on a counter waiting for its turn is food that's already past its best.
Also keep backup portions of your hero dishes in the kitchen. This is something Famine drilled into me on that stadium shoot. You always have a second version of your most important dishes ready to go. Because if the first plate doesn't work for any reason, heat, a styling adjustment that takes longer than expected, a lighting change that shifts the whole composition, you don't have time to cook fresh. You pull the backup, plate it fast, and shoot.
Secret 2: Glycerin Is the Most Underrated Tool in a Hot Climate Shoot
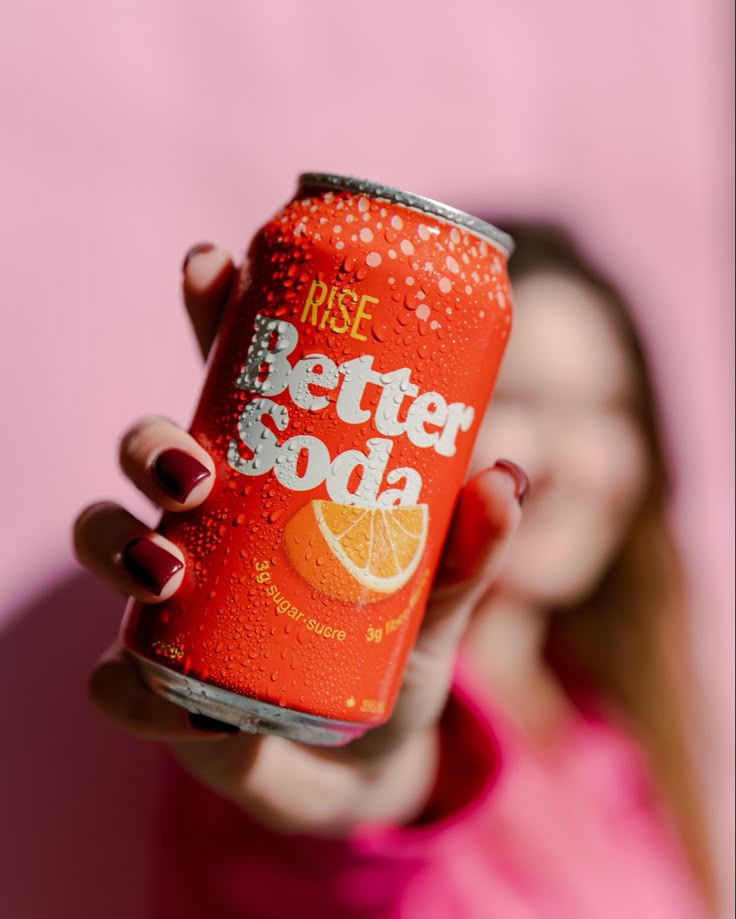
If you've ever wondered how drinks in professional photographs always look impossibly fresh, with perfect beads of condensation running down the glass, the answer in most cases is glycerin.
Glycerin mixed with water in a 1:1 ratio, sprayed lightly onto glassware, produce, and fresh ingredients, creates that dewy, just-out-of-the-fridge appearance. The reason it works in Dubai specifically is that glycerin does not evaporate. Water beads up and then disappears within minutes under studio lights or in direct heat. Glycerin stays exactly where you put it, maintaining the appearance of freshness for as long as you need the shot.
On produce, it makes vegetables look like they've just been washed. On a cocktail glass, it sells the cold without any actual ice that would melt. On fresh fruit, it enhances color and gives that market-fresh vibrancy that reads beautifully on camera.
Glycerin is food-safe, odorless, and available at any pharmacy. It is one of the cheapest and most effective tools in any food styling kit for this climate.
Related: for shoots involving beer, sparkling water, or any fizzy drink, a tiny pinch of salt added to the liquid makes the foam rise and creates the kind of active, alive effervescence that photographs as genuinely inviting. The salt dissipates immediately and doesn't affect taste if the drink is consumed after, but it gives you a window to capture foam that looks full and fresh rather than flat.
Secret 3: Toothpicks Are the Reason Your Favourite Burger Photos Exist
This is the one that surprises people most when they hear it. And it's the clearest example of how food styling is about engineering reality to its peak, not replacing it with something fake.
Think about a burger. A really good, tall, stacked burger with multiple patties, cheese, lettuce, tomato, sauce, a brioche bun. In reality, that burger, as built by a kitchen, will start to lean and collapse almost immediately. The weight of the ingredients compresses everything. The bun gets soggy from the sauce. The whole beautiful construction starts to look like it's given up within minutes of being plated.
Toothpicks, hidden strategically through the layers, hold the entire structure in place for the camera. They create the fake height that makes the burger look like the version of itself you want to eat, rather than the version that gravity and moisture are conspiring to produce. After the shot, the toothpicks come out. The food is real. The proportions are real. The structural support was temporary engineering to capture a real moment at its best.
The toothpick is not a deception. It's the same thing as a director telling an actor to hold a smile for one more second so the photographer can get the shot. The smile is real. The hold is technique.
The same principle applies to pancake stacks, layered sandwiches, tiered desserts, anything tall or structurally ambitious. Toothpicks hidden between layers, small pieces of cardboard hidden underneath to create height, props positioned just out of frame to prevent a lean. All of this is standard professional practice, and none of it changes what the food actually is.
For restaurant owners shooting their own content: if your dish has any height to it and you want it to look its best, invest thirty seconds in stabilising it before you shoot. A leaning burger or a collapsed stack is not a styling issue. It's a physics issue. Give it structural support and shoot fast.
Secret 4: The Razor, and Why the Details You Can't Eat Still Matter
Here's the weirdest thing in my kit. Not a food styling tool. Not even something most photographers would think to carry.
A razor.
When you use fabric in food styling, napkins, linen, tablecloths, the props that create context and warmth around the hero dish, ironing that fabric over and over eventually causes tiny threads to start coming out of the weave. Loose threads on a napkin that looked perfect in the studio look terrible in a photograph. The camera sees everything, often more than your eye does during setup.
I shave those threads off with the razor before they go anywhere near the set. Clean fabric. Clean edges. No distractions pulling the eye away from the food.
This sounds obsessive, and honestly it is. But it speaks to something important about food photography that restaurant owners sometimes miss: everything in the frame is making an argument about your brand. The dish is the hero, yes. But the surface it sits on, the prop next to it, the napkin underneath it, the shadow behind it, all of it is contributing to or detracting from the story you're telling.
A beautifully styled dish on a wrinkled, thread-worn napkin reads as careless. A modest dish on a perfectly composed, clean, thoughtful surface reads as considered. The food is the same. The impression is completely different.
In 2026, food photography styling has shifted toward natural materials: raw stone, unfinished wood, earth-toned linen, upcycled fabrics. These textures photograph beautifully and communicate sustainability and authenticity, values that UAE diners increasingly care about. But natural materials require more attention, not less. Stone has variation that needs to be positioned correctly. Wood grain has a direction that either works with your composition or fights it. These are not details you can ignore.
Secret 5: Two Things and a Window Can Change Everything
This one is specifically for restaurant owners who are shooting their own content. Maybe you're between professional shoots. Maybe you want to capture a new dish quickly for Instagram. Maybe your budget right now is your phone and some time on a slow afternoon.
Here is what I would tell you.
Do not shoot under your restaurant's internal lights. Not the ceiling lights, not the track lighting, not the decorative bulbs. Turn them off. They are working against you in ways that are invisible to your eye but very visible to your camera, and I wrote about exactly why in The Ultimate Guide to Food Photography for Dubai Restaurants.
What you need instead is two things and a window.
First: a white cloth curtain placed between the sunlight and your subject. This diffuses the direct sun into soft, even, flattering light. It removes the harsh shadows that direct sunlight creates while keeping the beautiful natural color temperature of daylight. A sheer white curtain, a white bedsheet, a large piece of white fabric, any of these work.
Second: a black card positioned on the opposite side of the dish from the window. This is your shadow control. The light coming through the curtain on one side will naturally fall off on the other side, and without anything to block that falloff, you get a flat image. The black card, which can be a piece of black cardboard, a black T-shirt draped over a chair, anything dark and matte, absorbs the bounced light on the shadow side and creates depth. That depth is what makes food look three-dimensional and real rather than flat and generic.
So: window with white diffusion on the left or right of your dish, never directly behind you as the photographer. Black card on the opposite side. Dish in between. Phone camera at 45 degrees or directly overhead depending on the food.
That setup, which costs nothing if you have a window and a dark piece of fabric, will produce images that are dramatically better than anything shot under ceiling lights with no thought given to the light direction.
Soft light from one side plus shadow control from the other. That's it. That's the foundation of every food photograph I've ever admired, including the ones shot in a proper studio with AED 50,000 worth of lighting equipment.
The principle doesn't change. Only the tools do.
The 2026 Reality: Authenticity Has Won
I want to end this post with something that I think is more important than any single technique.
The direction food photography is moving in 2026 is away from constructed perfection and toward captured reality. The most engaging food content right now is not the most styled. It's the most honest. Hands in the frame. A sauce that's slightly imperfect. Steam that's real, not created with wet cotton balls microwaved behind the dish. A half-eaten plate that shows someone actually enjoyed it.
This doesn't mean technique doesn't matter. It means the goal of technique has changed. You're no longer using styling to create an idealised fiction of the dish. You're using it to capture the dish at its genuine best and hold it there long enough to photograph it.
In Dubai's heat, that's a real challenge. The climate is actively working against you. But the answer isn't to replace real food with fake food. The answer is to understand your environment, plan your shoot sequence around it, use the right tools to slow down deterioration, and shoot fast when everything is at its peak.
The food that sells in 2026 is the food that looks like someone made it for you, not a machine. All of these techniques are in service of that one goal.
If you want to talk about what a properly planned food shoot looks like for your restaurant, including how we handle the heat, the sequencing, and the styling to get every dish looking its best, I'm always up for a conversation. Find me on Instagram at @ibrahim_food_photographer or see the full range of what we do at spinthirasmedia.com.


Comments